
[1. 오늘 배운 것]
1. 클래스, 객체, 상태, 행동
- 단순한 템플릿, 이를 바탕으로 객체 생성
MotorBike ducati = new MotorBike(100);
MotorBike honda = new MotorBike(100);
- ducati는 MotorBike의 인스턴스
- ducati, honda = 객체
- 상태 : 멤버 변수
- 행동 : 메서드
2. 상태와 생성자 결정
- Fan.class
package oop2;

import java.util.PrimitiveIterator;

public class Fan {
    //state
    private String make;
    private double radius;
    private String color;
    private boolean isOn;
    private byte speed;

    //creation
    public Fan(String make, double radius, String color){
        this.make = make;
        this.radius = radius;
        this.color = color;
    }

    //print the state
    public String toString(){
        return String.format("make - %s, radius -%f, color - %s, isOn - %b, speed - %d",
                make, radius, color, isOn, speed);
    }
}
- FanRunner.class
package oop2;

public class FanRunner {
    public static void main(String[] args) {
        Fan fan = new Fan("Manufacturer 1", 0.34567, "Green");

        System.out.println(fan);
    }
}
3. 메서드를 통한 행동 결정 - isOn
- Fan.class
...
public void switchOn(){
this.isOn = true;
}
public void switchOff(){
this.isOn = false;
}
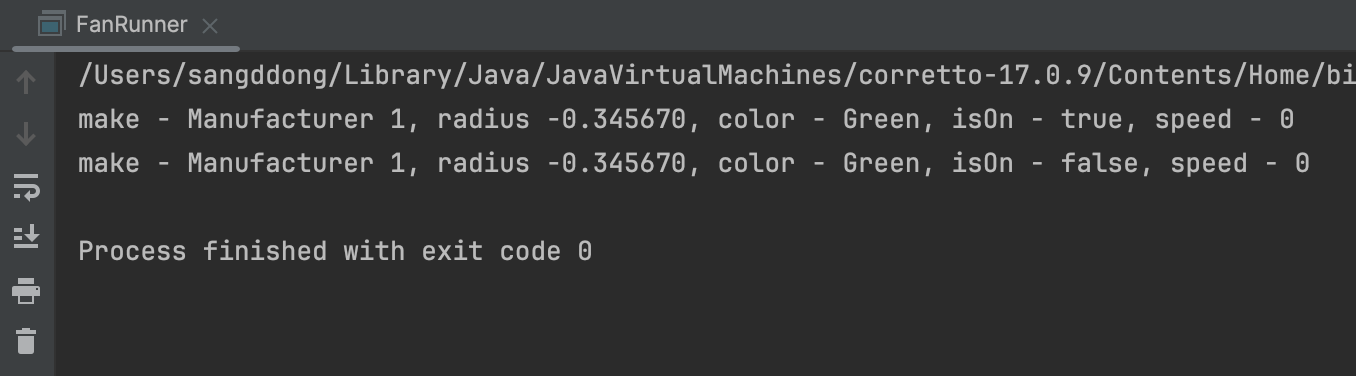
...- FanRunner.class
package oop2;

public class FanRunner {
    public static void main(String[] args) {
        Fan fan = new Fan("Manufacturer 1", 0.34567, "Green");
        fan.switchOn();
        System.out.println(fan);
        fan.switchOff();
        System.out.println(fan);
    }
}
- 결과
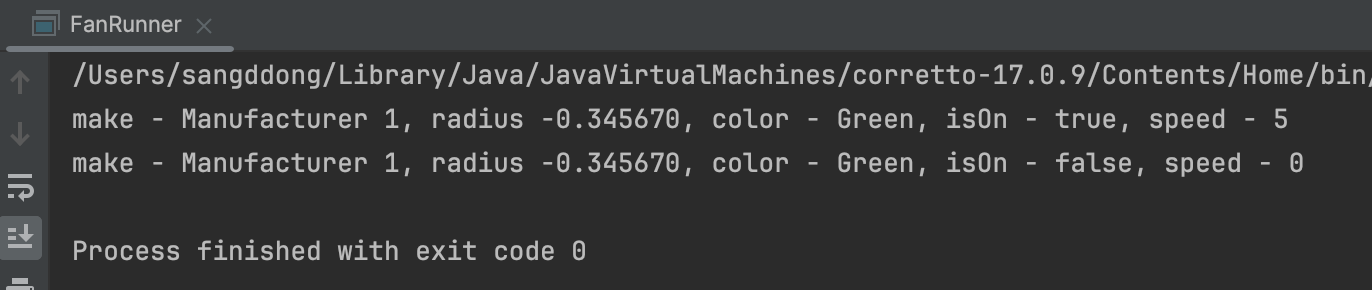
3. 메서드를 통한 행동 결정 - speed
-Fan.class
	...
    public void switchOn() {
        this.isOn = true;
        setSpeed((byte) 5);
    }

    public void switchOff() {
        this.isOn = false;
        setSpeed((byte) 0);
    }

    public void setSpeed(byte speed) {
        this.speed = speed;
    }
    ...
-FanRunner.class
package oop2;

public class FanRunner {
    public static void main(String[] args) {
        Fan fan = new Fan("Manufacturer 1", 0.34567, "Green");
        fan.switchOn();
        System.out.println(fan);
        fan.switchOff();
        System.out.println(fan);
    }
}
- 결과
5. 객체지향 프로그래밍 연습
- Rectangle.class
package oop2;

public class Rectangle {
    //state
    private int length;
    private int width;

    public int getLength() {
        return length;
    }

    public Rectangle(int length, int width){
        this.length = length;
        this.width = width;
    }

    public void setLength(int length) {
        this.length = length;
    }

    public int getWidth() {
        return width;
    }

    public void setWidth(int width) {
        this.width = width;
    }

    public int area(){
        return length*width;
    }

    public int perimeter(){
        return 2*(length+width);
    }

    public String toString(){
        return String.format("length - %d, width - %d, area - %d, perimeter - %d",
                length, width, area(), perimeter());
    }
}
- RectangleRunner.class
package oop2;

import org.w3c.dom.ls.LSOutput;

public class RectangleRunner {
    public static void main(String[] args) {
        Rectangle rectangle = new Rectangle(12, 23);
        System.out.println(rectangle);
        rectangle.setWidth(25);
        System.out.println(rectangle);
    }
}
6. 고객 주소 예시를 통한 객체 컴포지션 이해
- 구성관계 : 객체 안에 또다른 객체를 가질 수 있음
- Address.class
package oop2.level2;

public class Address {
    private String line1;
    private String city;
    private String zip;

    //creation
    public Address(String line1, String city, String zip){
        super();
        this.line1 = line1;
        this.city = city;
        this.zip = zip;
    }

    public String toString(){
        return line1+" "+city+" "+zip;
    }
}
- Customer.class
package oop2.level2;

public class Customer {
    //state
    private String name;
    private Address homeAddress;
    private Address workAddress;

    //creating
    public Customer(String name, Address homeAddress){
        this.name = name;
        this.homeAddress = homeAddress;
    }

    public String getName() {
        return name;
    }

    public void setName(String name) {
        this.name = name;
    }

    public Address getHomeAddress() {
        return homeAddress;
    }

    public void setHomeAddress(Address homeAddress) {
        this.homeAddress = homeAddress;
    }

    public Address getWorkAddress() {
        return workAddress;
    }

    public void setWorkAddress(Address workAddress) {
        this.workAddress = workAddress;
    }

    public String toString(){
        return String.format("name - [%s], home address - [%s], work address - [%s]",
        name, homeAddress, workAddress );
    }
}
- CustomerRunner
package oop2.level2;

public class CustomerRunner {
    Address homeAddress = new Address("line1", "Hyderabad", "500035");
    Customer customer = new Customer("Ranga", homeAddress);

    Address workAddress = new Address("line1 for work", "Hyderabad", "500078");
    customer.setWorkAddress(workAddress);
}
7. 객체 컴포지션 이해 - Books and Reviews
- Book.class
package oop2.level2.book;

import java.util.ArrayList;

public class Book {
    private int id;
    private String name;
    private String author;
    private ArrayList<Review> reviews = new ArrayList<>();

    public Book(int id, String name, String author) {
        this.id = id;
        this.name = name;
        this.author = author;
    }

    public void addReview(Review review){
        this.reviews.add(review);
    }

    public String toString(){
        return String.format("id = %d, name = %s, author = %s, Reviews = %s",
                id, name, author, reviews);
    }
}
- Review.class
package oop2.level2.book;

public class Review {
    private int id;
    private String description;
    private int rating;

    public Review(int id, String description, int rating){
        this.id=id;
        this.description = description;
        this.rating = rating;
    }

    public String toString(){
        return id+" "+description+" "+rating;
    }
}
- BookRunner.class
package oop2.level2.book;

import oop2.level2.book.Book;
import oop2.level2.book.Review;

public class BookRunner {
    public static void main(String[] args) {
        Book book = new Book(123, "OOP with Java", "Ranga");
        book.addReview(new Review(10, "Great Book", 5));
        book.addReview(new Review(101, "Awesome", 5));

        System.out.println(book);
    }
}
8. 상속 이해 - 왜 상속을 사용해야 하는가?
- Person.class
package oop2.level2.inheritance;

public class Person {
    private String name;
    private String email;
    private String phoneNumber;

    public String getName() {
        return name;
    }

    public void setName(String name) {
        this.name = name;
    }

    public String getEmail() {
        return email;
    }

    public void setEmail(String email) {
        this.email = email;
    }

    public String getPhoneNumber() {
        return phoneNumber;
    }

    public void setPhoneNumber(String phoneNumber) {
        this.phoneNumber = phoneNumber;
    }

}
- Student.class
package oop2.level2.inheritance;

public class Student extends Person{
    private String college;
    private int year;

    public String getCollege() {
        return college;
    }

    public void setCollege(String college) {
        this.college = college;
    }

    public int getYear() {
        return year;
    }

    public void setYear(int year) {
        this.year = year;
    }
}
- StudentRunner.class
package oop2.level2.inheritance;

public class StudentRunner {
    public static void main(String[] args) {
        Student student = new Student();
        student.setName("Ranga");
        student.setEmail("dfasfasf@sfdsf");
    }
}
9. 오버라이딩
- 상위클래스로부터 받은 메서드를 다른 방식으로 구현하는 것
- 자신에게 맞는 방식으로 구현
10. 자바 상속 연습 - Student, Employee
- Employee.class
package oop2.level2.inheritance;

import java.math.BigDecimal;

public class Employee extends Person{
    private String title;
    private String employerName;
    private char employeeGrade;
    private BigDecimal salary;

    public String getTitle() {
        return title;
    }

    public void setTitle(String title) {
        this.title = title;
    }

    public String getEmployerName() {
        return employerName;
    }

    public void setEmployerName(String employerName) {
        this.employerName = employerName;
    }

    public char getEmployeeGrade() {
        return employeeGrade;
    }

    public void setEmployeeGrade(char employeeGrade) {
        this.employeeGrade = employeeGrade;
    }

    public BigDecimal getSalary() {
        return salary;
    }

    public void setSalary(BigDecimal salary) {
        this.salary = salary;
    }

    public String toString() {
        return super.toString()+title +"#"+employerName+"#"+getPhoneNumber();
    }
}
- super.toString을 사용해서 Person클래스의 세부 정보를 얻을 수 있다
11. 초기설정 생성자와 super()메소드 호출
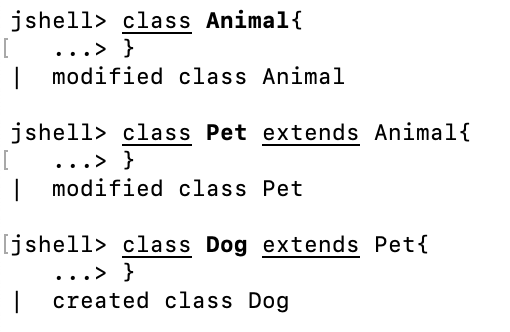
12. 다중상속
- 자바에서는 다중상속이 불가능하다
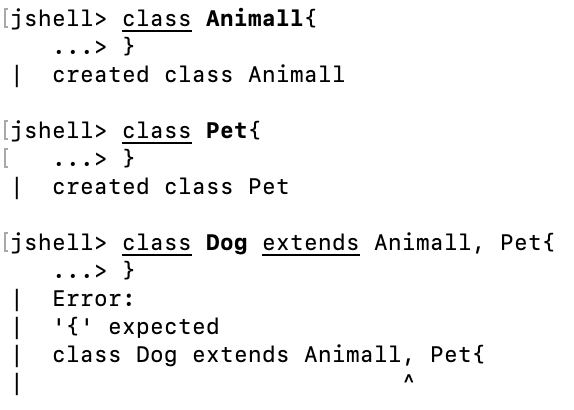
- 연쇄적으로 상속하는 것은 가능
13. 자바 추상 클래스
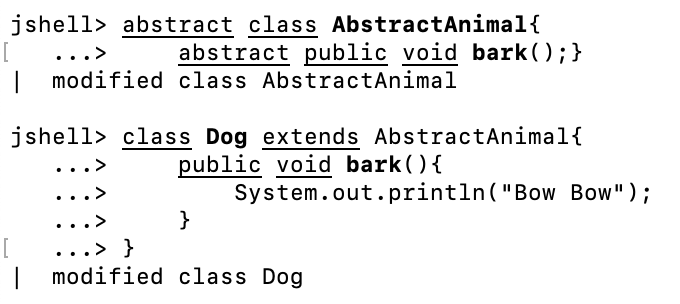
- 추상 클래스의 인스턴스는 만들어질 수 없음

14. 자바 추상 클래스 - 템플릿 메소드 패턴으로 레시피 만들기
- 추상화 클래스들은 높은 단계의 알고리즘을 적용하고 자세한 세부정보들은 적용 클래스(추상클래스를 연장하는 클래스)들에게 맡김
- AbstractRecipe.abstract class
package oop2.level2.Abstract;
public abstract class AbstractRecipe {
public void execute(){
getReady();
doTheDish();
cleanUp();
}
abstract void getReady();
abstract void doTheDish();
abstract void cleanUp();
//prepare
//recipe
//cleanup
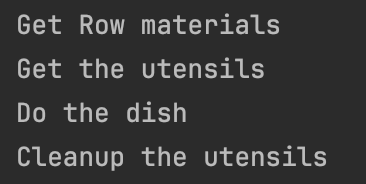
}- Recipe1
package oop2.level2.Abstract;

public class Recipe1 extends AbstractRecipe{

    @Override
    void getReady() {
        System.out.println("Get Row materials");
        System.out.println("Get the utensils");
    }

    @Override
    void doTheDish() {
        System.out.println("Do the dish");
    }

    @Override
    void cleanUp() {
        System.out.println("Cleanup the utensils");
    }
}
- RecipeRunner
package oop2.level2.Abstract;

public class RecipeRunner {
    public static void main(String[] args) {
        Recipe1 recipe = new Recipe1();
        recipe.execute();
    }
}
- 결과
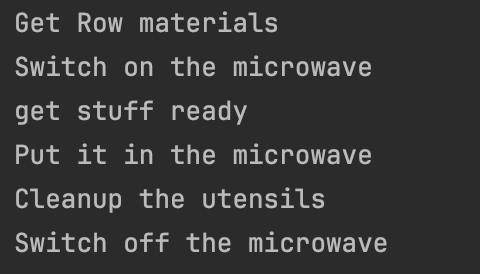
14-1
-recipeWithMicrowave
package oop2.level2.Abstract;

public class RecipeWithMicrowave extends AbstractRecipe{
    @Override
    void getReady() {
        System.out.println("Get Row materials");
        System.out.println("Switch on the microwave");
    }

    @Override
    void doTheDish() {
        System.out.println("get stuff ready");
        System.out.println("Put it in the microwave");
    }

    @Override
    void cleanUp() {
        System.out.println("Cleanup the utensils");
        System.out.println("Switch off the microwave");
    }
}
- recipeRunner
package oop2.level2.Abstract;

public class RecipeRunner {
    public static void main(String[] args) {
//        Recipe1 recipe = new Recipe1();
//        recipe.execute();

        RecipeWithMicrowave recipeWithMicrowave= new RecipeWithMicrowave();
        recipeWithMicrowave.execute();
    }
}
- 결과
15. 자바 추상 클래스
- 추상 클래스는 다른 추상 클래스를 연장할 수 있다
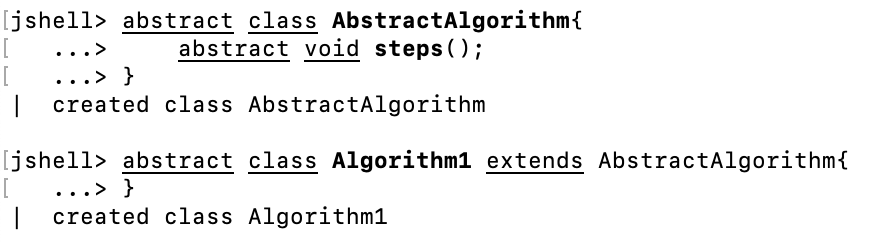
- 추상 클래스는 정의된 변수들을 가질 수 있고 구상적으로 정의된 메소드들을 가질 수 있음
- 폐쇄형이나 개방형 변수들을 가질 수 있음
16. 인터페이스
- 인터페이스는 기본적으로 공통적인 시행 가능 행동들을 대표하는 것
- 다형성
- 여러 구현들 사이를 오가게 할 수 있는 방법 제공
- GamingConsole.interface
package oop2.level2.Interface;

public interface GamingConsole {
    public void up();
    public void down();
    public void left();
    public void right();
}
- MarioGame.class
package oop2.level2.Interface;
public class MarioGame implements GamingConsole{
@Override
public void up() {
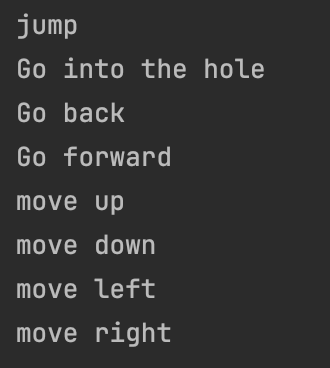
System.out.println("jump");
}
@Override
public void down() {
System.out.println("Go into the hole");
}
@Override
public void left() {
System.out.println("Go back");
}
@Override
public void right() {
System.out.println("Go forward");
}
}- ChessGame
package oop2.level2.Interface;

public class ChessGame implements GamingConsole{
    @Override
    public void up() {
        System.out.println("move up");
    }

    @Override
    public void down() {
        System.out.println("move down");
    }

    @Override
    public void left() {
        System.out.println("move left");
    }

    @Override
    public void right() {
        System.out.println("move right");
    }
}
- GameRunner
package oop2.level2.Interface;

public class GameRunner {
    public static void main(String[] args) {
        MarioGame game1 = new MarioGame();
        game1.up();
        game1.down();
        game1.left();
        game1.right();

        ChessGame game2 = new ChessGame();
        game2.up();
        game2.down();
        game2.left();
        game2.right();
    }
}
17. 인터페이스의 구현
- 인터페이스를 구현하려면, 메소드를 구현하는 클래스가 필요하다
- 하지만, 추상 클래스로 구현할 경우 일부 구현이 가능하다
18. 추상클래스와 인터페이스 비교
- 인터페이스를 사용하는 경우 : 두 시스템 사이의 소통이 필요할 때, 두 클래스 또는 두 인스턴스가 서로 소통해야할 때 소통 방식을 정하기 위해 사용
- 추상클래스 : 상위 단계의 구조를 제공하고 싶을 때, 구현의 자세한 부분은 하위 클래스에 맡기고 싶을 때
- 인터페이스에는 변수를 넣을 수 없다
19. 다형성
- GamingRunner.class
package oop2.level2.Interface;

public class GameRunner {
    public static void main(String[] args) {
        GamingConsole[] games = {new MarioGame(), new ChessGame()};

        for(GamingConsole game : games) {
            game.up();
            game.down();
            game.left();
            game.right();
        }
    }
}
- 결과
20. 리스트
- 순서가 있는 집합
- 직접 특정 위치에 값 삽입 가능, 특정한 위치에서 요소를 가져올 수 있음
- 위치값에 접근 가능하다는 의미
- 중복 허용
- .size()로 크기 확인 가능
- .isEmpty()로 비어있는지 확인 가능
- .get(n) 으로 n번째 요소에 접근 가능
- .contains(m)로 m이 포함되어있는지 확인 가능
- .indexOf(m) 으로 m의 인덱스값 확인 가능
21. 리스트 불변성
- List.of으로 만든 리스트는 불변성을 가짐
- new 키워드로 만든 리스트는 가변성을 가짐
22. ArrayList vs LinkedList
- ArrayList의 경우, 삽입과 제거가 느리지만 특정 위치의 요소에 접근하는 것은 빠름
- LinkedList의 경우, 삽입과 제거가 배열보다 쉽지만 특정 위치의 요소에 접근하는 것은 소모적임
23. ArrayList vs Vector
- Vector: 동기화되어있음, 스레드-안전, 안전이 필요한 경우 사용
- ArrayList : 동기화되어있지 않음, 안전x
[2. 오늘 잘한 점]
팀스터디 시간에 계획을 미리미리 짜둬서 마음편히 진행할 수 있었다. 또 시간 안에 자료조사를 다 마쳐서 여유있게 마쳤다.
[3. 개선해야할 점]
타자가 느린건지 강의 코드를 따라치다가 시간이 다 가버려서 아슬아슬하게 강의를 들었다. 요령이 필요할 것 같다...
'부트캠프' 카테고리의 다른 글
| [TIL] 유데미 X 사람인 취업 부트캠프 24일차 / java (1) | 2024.01.17 |
|---|---|
| [TIL] 유데미X사람인 취업 부트캠프 23일차 / java (0) | 2024.01.16 |
| [TIL] 유데미X사람인 취업 부트캠프 21일차 / java (1) | 2024.01.12 |
| [TIL] 유데미X사람인 취업 부트캠프 20일차 / java (1) | 2024.01.11 |
| [TIL] 유데미 X 사람인 취업 부트캠프 19일차 / java (0) | 2024.01.10 |


