[2월 5일]
1. 타입스크립트
- 자바스크립트의 모든 기능을 포함하는 상위 집합
- 코드에 명시적으로 타입을 지정할 수 있게 해줌
- 정적 타입 검사 : 타입스크립트는 컴파일 시점에 타입 검사를 받아 실행 전에 오류를 발견하고 수정 가능
- 객체 지향 프로그래밍과 인터페이스 제공
- 예시코드
function greet(name: string): string {
    return `hello, ${name}!`;
}

const name = "World";
console.log(greet(name));
2. 타이스크립트 예시 코드
(1) Counter
- 배열은 타입[]으로 설정할 수 있고 Array<타입>으로 설정할 수 있다
- useState를 사용할 때 value의 값을 0으로 설정하나, undefined일 수 있음을 명시한다
import { useState } from "react";

type NumberArray = Array<number>;
string[]
Array<string>

function Counter() {
    const [value, setValue] = useState<number|undefined>(0);

    return (
        <div>
            <div>{value}</div>
            <div>
                <button>+</button>
                <button>-</button>
            </div>
        </div>
    )
}

export default Counter;
(2) Display
- interface를 통해 size의 종류를 지정한다
- PropsWithChildren을 사용해서 prop을 받아온다
import { PropsWithChildren } from "react";

interface DisplayProps {
    size: "sm" | "md" | "lg";
}

function Display({ size: children }: PropsWithChildren<DisplayProps>) {
    return <div>{children}</div>
}

export default Display;
(3) Post
- Post객체 안에 title과 content를 넣고 타입을 미리 지정한다
- PostProps에 Post를 post로 정의한다
type Post = { title: string; content: string };

interface PostProps {
    post: Post;
}

function Post({ post }: PostProps) {
    return (
        <div>
            <h6>{post.title}</h6>
            <p>{post.content}</p>
        </div>
    )
}

export default Post;
[2월 6일]
1. NEXT 기초
- react기반의 츠레임워크로 서버사이드 렌더링, 정적 사이트 생성, 클라이언트 사이드 렌더링 등을 지원
2. NEXT 프로젝트 시작
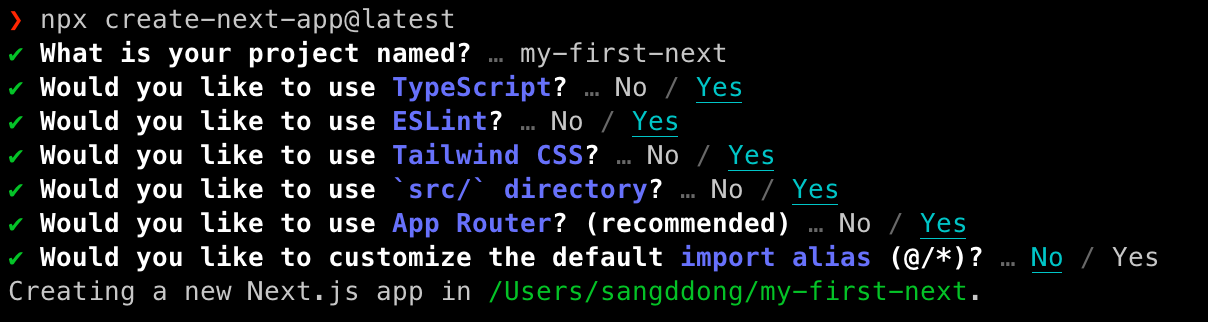
(1) 터미널에 입력
npx create-next-app@latest
(2) 선택사항
3. 폴더구조
- 폴더명 자체가 경로가 된다!
- 폴더명을 소괄호 안에 적으면 그 경로는 무시됨
- 폴더명을 대괄호 안에 적으면 파람이 됨
- 예시) src/app/(root)/posts/[postId]/page.js => localhost:3000/posts/1
4. import Link from next-Link
- next에서는 링크 간 이동을 위해서 Link href를 사용
import Link from "next/Link"

export default function HomePage() {
    return (
        <main>
            <Link href="/posts">포스트 목록 페이지로 이동하기</Link>
        </main>
    );
}
5. 동적 라우팅 구현
export default function Page(props) {
    const params = props.params;
    const postId = params.postId;

    return (
        <div>포스트 상세 페이지</div>
        <div>현재 포스트는 {postId}번입니다.</div>
    );
}
6. 서버에서 데이터 가져오기
- 포스츠 리스츠 페이지
async function getPosts() {
    const response = await fetch("링크");
    const data = await response.json();

    return data;
}

export default async function PostListPage() {
	const posts = await getPosts();
    return (
        <div>
            <nav>
                <ul>
                    {post.map((post)=>{
                        <li key={post.id}>
                            <Link href={`/posts/${post.id}`}>{post.title}<Link>
                        </li>
                    })}
                </ul>
            </nav>
        </div>
    )
}
- 포스트 상세 페이지
async getPost(postId) {
    const response = await fetch("링크/${[pstId}");
    cosnt data = await response.json();

    return data;
}

export default function PostDetailPage(props){
    const params = props.params;
    const data = paras.postId;

    return (
        <div>
            <h1>{post.title}</h1>
            <p>{post.body}</p>
        </div>
    )
}
[2월 7일 ~ 8일]
1. TILTIL만들기
(1) TIL 생성 및 가져오기 함수
import { Til } from "@/types/Til.type";

export async function getTils() {
  const url = "https://port-0-ballang-server-qrd2als49b8m4.sel5.cloudtype.app/til";
  const options = { method: "GET" };

  const response = await fetch(url, options);
  const data = await response.json();

  return data as Til[];
}

export async function getTil(id: string) {
  const url = `https://port-0-ballang-server-qrd2als49b8m4.sel5.cloudtype.app/til/${id}`;
  const options = { method: "GET" };
  const response = await fetch(url, options);
  const data = await response.json();

  return data as Til;
}

export async function createTil(til: { title: string; content: string }) {
  const url = `${window.location.origin}/api/til`;
  const options = { method: "POST", body: JSON.stringify(til) };
  const response = await fetch(url, options);
  const data = await response.json();

  return data as Til;
}

const tils = {
  getTils,
  getTil,
  createTil,
};

export default tils;
(2) 쿼리 사용하기
"use client";

import API from "@/api";
import TilCard from "@/components/TilCard";
import { Til } from "@/types/Til.type";
import { useQuery } from "@tanstack/react-query";

function PopularTils() {
  const returnValueOfUseQuery = useQuery({
    queryKey: ["tils", { isList: true, type: "popular" }],
    queryFn: API.tils.getTils,
    refetchOnWindowFocus: true,
  });
  const { data: tils, isLoading } = returnValueOfUseQuery;

  return (
    <div>
      {isLoading ? (
        "로딩중..."
      ) : (
        <ol className="flex flex-col gap-y-4">
          {tils.map((til: Til) => (
            <li key={til.id}>
              <TilCard key={til.id} til={til} />
            </li>
          ))}
        </ol>
      )}
    </div>
  );
}

export default PopularTils;
import Link from "next/link";
import { PropsWithChildren } from "react";
type Til = {
id: string;
title: string;
content: string;
};
interface TilCardProps {
til: Til;
}
function TilCard({ til }: PropsWithChildren<TilCardProps>) {
return (
<Link href={`/tils/${til.id}`} className="block">
<div className="border p-5 rounded-md flex flex-col gap-y-4">
<h6 className="text-lg font-bold">{til.title}</h6>
<p className="text-sm">{til.content.slice(0, 20)}...</p>
</div>
</Link>
);
}
export default TilCard;
[회고]
한 주에 너무 많은 것을 뇌에 쑤셔넣으려고 했다,,
외장하드가 필요하다,,,,,,,,,,,,,,,,,,,,,,,,,,,
그리고 자바스크립트 능력도,,